

TL;DR: If you care about conversions, payment gateway integration is where it all happens. In this guide, we get into the real nuts and bolts behind Stripe, PayPal, and Apple Pay - including dealing with webhook headaches, retrying failures, and handling PCI compliance surprises that come up when you’re building checkout systems for real-world production.
Why Your Checkout Matters Way More Than Your Landing Page
Let this stat sink in: cart abandonment in ecommerce hovers around 70%. That’s brutal, right? According to Baymard Institute, 17% of people bail because the checkout process is just too messy. Another 9% leave because the payment options are too limited.
That means payment and checkout problems are costing you over a quarter of your potential sales. It’s painful. (If you want the full breakdown on tackling cart abandonment beyond payments, our ecommerce cart optimization guide covers the 10 highest-impact fixes.)
We’ve worked on payment integrations for ecommerce sites ranging from small shops to those handling frantic flash sales with tens of thousands of transactions. And the pattern never changes: teams who treat checkout architecture as a core engineering project - not just something slapped on after the landing page looks good - are the ones who convert best.
This guide is what we wish we’d had the first time we tried building a multi-provider payment system. We’re cutting through the fluff, we’ll show you the real architecture for Stripe, PayPal, and Apple Pay. That means everything from the 2 AM webhook failures to the PCI compliance choices you need to avoid nasty surprises, plus architecture strategies that actually perform when traffic spikes.
What’s Really Happening When Someone Pays
Okay, before we start naming names like Stripe or PayPal, let’s look at what actually goes down when someone clicks “Pay.” If you don’t really get the flow, you end up losing orders with no clue what went wrong.
The Four Key Players
Every ecommerce payment flow involves four main parties:
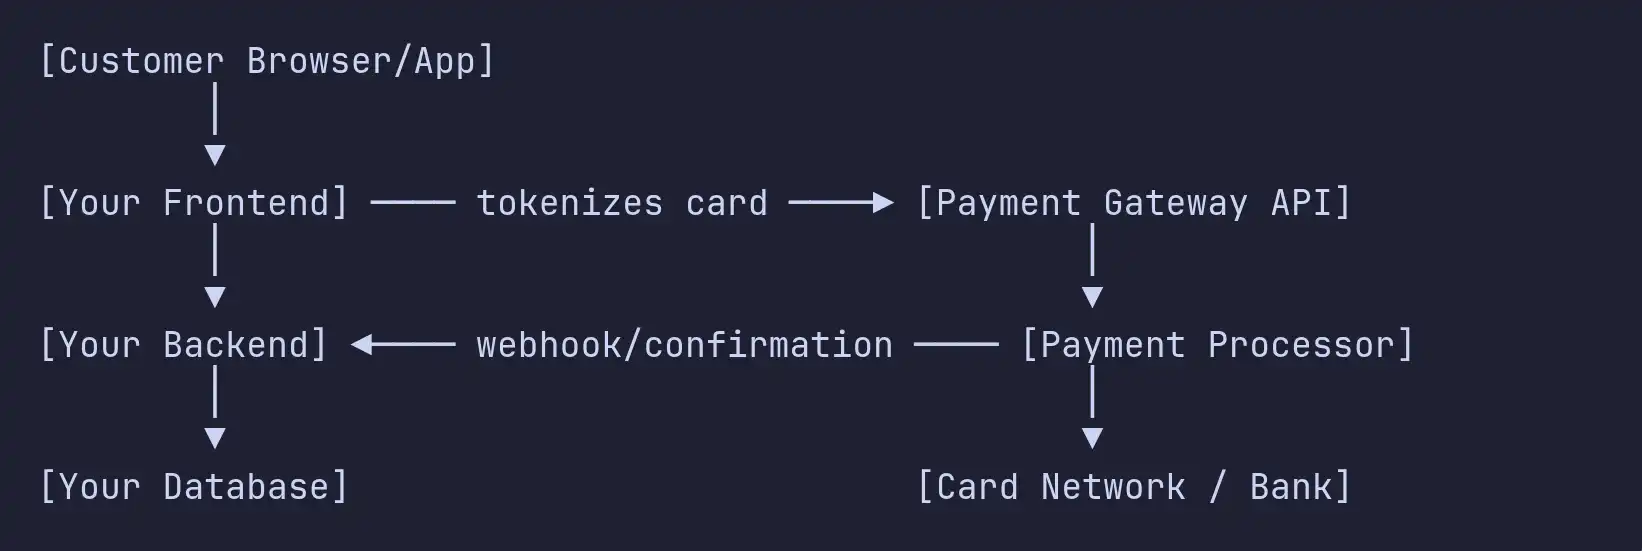
- Frontend: The frontend grabs the payment info from the user and tokenizes it right there in the browser so you never touch the raw card numbers.
- Backend: The backend handles creating payment intents, checking orders, and managing webhook events.
- Payment Gateway: Stripe, PayPal, or Apple Pay steps in here. this is where the actual payment gets processed and the gateway talks to the card networks.
- Card Networks / Banks: Visa, Mastercard, or the user’s bank decides to approve or decline each transaction.
Two Integration Patterns
There are really just two ways to hook up a payment gateway for ecommerce:
Hosted Checkout: You send your customers off to Stripe Checkout, PayPal's payment page, or something similar. The payment provider takes care of the whole interface from entering details to confirming payment and then they bounce people back to your site. This route is the quickest to launch, and you barely have to worry about PCI compliance. The main downside is you lose some control over what the checkout looks like, and those redirects can be a little jarring for users.
Custom Integration: Here, you keep customers on your site by embedding payment fields directly into your checkout. With Stripe Elements or PayPal’s Smart Buttons, the UI shows up in an iframe, so people never leave. It takes more engineering and time, but that smooth, seamless checkout usually means higher conversions.
From our experience, you want to start with the hosted checkout get your store live, see how things feel, and figure out if the business works. Then, once you’re serious about optimizing conversions, swap over to the custom integration. We’ve made that switch three times now: the hosted version is ready in days, the custom one takes a few weeks, and the jump in conversion rates (5–12%) makes the extra work worth it. If you’re weighing the full cost picture of going custom, our custom ecommerce platform cost breakdown lays out real numbers by scope and architecture.
Struggling with payment drop-offs at checkout?
We’ve integrated Stripe, PayPal, and Apple Pay for ecommerce platforms handling thousands of daily transactions - and we know exactly where the conversion leaks happen.
Book a free scoping call and we’ll audit your checkout flow, identify the biggest drop-off points, and recommend a payment integration strategy that fits your stack.
Stripe Ecommerce Integration: A Developer-First Way to Build
Stripe is our go-to for ecommerce, unless there’s some very specific reason to choose something else. The API feels solid, the docs actually help you, and the Payment Intents API sorts out all the mess around 3D Secure, Strong Customer Authentication, and complicated payment flows. It's almost enjoyable.
Payment Intents: The Heart of the Flow
The Payment Intents API is where everything starts. Each PaymentIntent tracks a single payment attempt from creation to finish.
Here's how you'd create one on the server:
// server.js - Create a PaymentIntent for the order
const express = require('express');
const stripe = require('stripe')(process.env.STRIPE_SECRET_KEY);

app.post('/api/create-payment-intent', async (req, res) => {
  const { orderId, currency = 'usd' } = req.body;

  // Always calculate the amount server-side from your order data.
  // Never trust the amount sent from the client.
  const order = await OrderService.getById(orderId);
  if (!order) return res.status(404).json({ error: 'Order not found' });

  const amount = calculateOrderTotal(order); // returns amount in cents

  try {
    const paymentIntent = await stripe.paymentIntents.create({
      amount,
      currency,
      metadata: {
        orderId: order.id,
        customerEmail: order.customerEmail,
      },
      // Enable automatic payment methods - Stripe shows the most relevant
      // options based on the customer's location and device
      automatic_payment_methods: { enabled: true },
    });

    // Only send the client secret to the frontend - never the full object
    res.json({ clientSecret: paymentIntent.client_secret });
  } catch (err) {
    console.error('PaymentIntent creation failed:', err.message);
    res.status(500).json({ error: 'Payment initialization failed' });
  }
});
And the client-side confirmation using Stripe Elements:
// checkout.js - Confirm payment on the client
import { loadStripe } from '@stripe/stripe-js';

const stripe = await loadStripe(process.env.NEXT_PUBLIC_STRIPE_PUBLISHABLE_KEY);

async function handlePayment(clientSecret) {
  const { error, paymentIntent } = await stripe.confirmPayment({
    elements,  // Stripe Elements instance mounted on the page
    clientSecret,
    confirmParams: {
      return_url: `$\{window.location.origin}/order-confirmation`,
    },
    // Use redirect: 'if_required' to avoid unnecessary redirects
    // for simple card payments, while still supporting 3D Secure
    redirect: 'if_required',
  });

  if (error) {
    // Show error in the payment form - don't just log it
    showPaymentError(error.message);
  } else if (paymentIntent.status === 'succeeded') {
    // Payment confirmed client-side - but ALWAYS verify via webhook
    // before fulfilling the order. This UI update is just for UX.
    showOrderConfirmation(paymentIntent.id);
  }
}
Don’t ever rely on the client-side confirmation to fulfill orders.
Teams mess this up all the time. Sure, checking if paymentIntent.status === 'succeeded' on the client is fine for letting users know their payment went through. It’s great for UI feedback, like showing a “Thanks for your order” screen. But handing out products or shipping something based on that alone? Bad idea.
Here’s why: Your client can be tampered with. Someone could hack the code, skip the actual payment step, and trigger your fulfillment logic anyway. If you trust the client-side status, you’re asking for trouble. The only way to know for sure that you got paid? Wait for Stripe’s webhook.
Webhook Handling: Where Production Systems Are Made
That’s really where the magic happens in a real production setup. Webhooks carry actual authority. Stripe sends your server a notice when a payment’s finalized, and your backend should do the heavy lifting from there. Handle those events carefully, make sure your logic runs just once no matter how many times Stripe calls you and you’ll build something that’s both secure and reliable. That’s how professional ecommerce systems work.
// webhooks.js - Handle Stripe webhook events
const endpointSecret = process.env.STRIPE_WEBHOOK_SECRET;

app.post('/webhooks/stripe', express.raw({ type: 'application/json' }), async (req, res) => {
  const sig = req.headers['stripe-signature'];
  let event;

  try {
    // Always verify the webhook signature - never skip this
    event = stripe.webhooks.constructEvent(req.body, sig, endpointSecret);
  } catch (err) {
    console.error('Webhook signature verification failed:', err.message);
    return res.status(400).send(`Webhook Error: $\{err.message}`);
  }

  // Idempotency: check if we've already processed this event
  const existing = await ProcessedEvent.findByEventId(event.id);
  if (existing) {
    return res.json({ received: true, status: 'already_processed' });
  }

  switch (event.type) {
    case 'payment_intent.succeeded': {
      const paymentIntent = event.data.object;
      const orderId = paymentIntent.metadata.orderId;

      await OrderService.markPaid(orderId, {
        stripePaymentId: paymentIntent.id,
        amount: paymentIntent.amount,
        currency: paymentIntent.currency,
      });

      // Trigger fulfillment - shipping, digital delivery, etc.
      await FulfillmentService.initiate(orderId);
      break;
    }

    case 'payment_intent.payment_failed': {
      const paymentIntent = event.data.object;
      const orderId = paymentIntent.metadata.orderId;
      const failureMessage = paymentIntent.last_payment_error?.message;

      await OrderService.markPaymentFailed(orderId, failureMessage);
      // Optionally notify the customer to retry
      await NotificationService.sendPaymentFailedEmail(orderId);
      break;
    }

    // Handle refunds, disputes, etc.
    case 'charge.refunded':
      await handleRefund(event.data.object);
      break;

    case 'charge.dispute.created':
      await handleDispute(event.data.object);
      break;
  }

  // Record that we processed this event
  await ProcessedEvent.create({ eventId: event.id, type: event.type });

  res.json({ received: true });
});
Stripe Security: PCI Compliance and Tokenization
When you use Stripe Elements or Checkout, your server never actually sees the customer’s card data. Stripe’s JavaScript SDK grabs the card number, CVC, and expiry inside an iframe hosted right on Stripe’s own domain. You can style the form to match your site, but you can’t access or touch the sensitive info.
This setup means you only need to worry about the easiest PCI compliance tiers-SAQ A or SAQ A-EP instead of the nightmare that is SAQ D. For most online stores, that’s the difference between answering a quick 20-question checklist and slogging through 300+ questions.
Here’s what we always turn on in production environments:
- Radar for Fraud Detection: Stripe’s anti-fraud engine is built-in, so use Radar rules. Add things like velocity checks (to block too many attempts from one IP), blocks for high-risk countries, and declines for CVC or AVS mismatches.
- 3D Secure: With Stripe’s Payment Intents API, Strong Customer Authentication (SCA) just works. If you’re in Europe, PSD2 requires it. The API only pops up 3D Secure challenges when the bank wants one customers don’t see extra steps unless they have to.
- Webhook Endpoint Secrets: Always check webhook signatures. If you skip this, anyone who finds your webhook URL can fake events and mess with your system.
Need a production-grade Stripe integration?
We've built Stripe payment flows for ecommerce platforms processing millions in GMV - with proper webhook handling, idempotency, and fraud detection baked in from day one.
Book a free scoping call and we'll help you design a payment architecture that's secure, scalable, and optimized for conversions.
PayPal Integration: Global Reach and Buyer Trust
Let’s be real PayPal isn’t winning awards for developer experience. But with 430+ million active accounts, it’s everywhere. In plenty of markets (think Germany, Australia, or much of Southeast Asia), tons of people would rather pay with PayPal than type in a card. If you skip PayPal, you’re literally turning away customers.
Smart Payment Buttons: The Modern PayPal Integration
Smart Payment Buttons are PayPal’s recommended way to do checkout these days. They show up based on the shopper’s location and device so you don’t just get PayPal, but also PayPal Credit, Venmo, or whatever local options actually matter.
// Frontend: Render PayPal Smart Payment Buttons
paypal.Buttons({
  // Create the order on PayPal's servers
  createOrder: async (data, actions) => {
    // Call your backend to create the order and get the PayPal order ID
    const response = await fetch('/api/paypal/create-order', {
      method: 'POST',
      headers: { 'Content-Type': 'application/json' },
      body: JSON.stringify({ cartId: currentCartId }),
    });
    const { orderId } = await response.json();
    return orderId;
  },

  // Called when the buyer approves the payment
  onApprove: async (data, actions) => {
    const response = await fetch('/api/paypal/capture-order', {
      method: 'POST',
      headers: { 'Content-Type': 'application/json' },
      body: JSON.stringify({ orderId: data.orderID }),
    });
    const result = await response.json();

    if (result.status === 'COMPLETED') {
      window.location.href = `/order-confirmation?id=$\{result.internalOrderId}`;
    }
  },

  onError: (err) => {
    console.error('PayPal error:', err);
    showPaymentError('Payment could not be processed. Please try again.');
  },
}).render('#paypal-button-container');
The server-side order creation and capture:
// server.js - PayPal order creation and capture
const paypal = require('@paypal/checkout-server-sdk');

// Configure PayPal environment
const environment = process.env.NODE_ENV === 'production'
  ? new paypal.core.LiveEnvironment(
      process.env.PAYPAL_CLIENT_ID,
      process.env.PAYPAL_CLIENT_SECRET
    )
  : new paypal.core.SandboxEnvironment(
      process.env.PAYPAL_CLIENT_ID,
      process.env.PAYPAL_CLIENT_SECRET
    );
const client = new paypal.core.PayPalHttpClient(environment);

app.post('/api/paypal/create-order', async (req, res) => {
  const { cartId } = req.body;
  const cart = await CartService.getById(cartId);

  const request = new paypal.orders.OrdersCreateRequest();
  request.prefer('return=representation');
  request.requestBody({
    intent: 'CAPTURE',
    purchase_units: [{
      reference_id: cart.id,
      amount: {
        currency_code: 'USD',
        value: cart.total.toFixed(2),
        breakdown: {
          item_total: { currency_code: 'USD', value: cart.subtotal.toFixed(2) },
          shipping: { currency_code: 'USD', value: cart.shipping.toFixed(2) },
          tax_total: { currency_code: 'USD', value: cart.tax.toFixed(2) },
        },
      },
      items: cart.items.map(item => ({
        name: item.name,
        unit_amount: { currency_code: 'USD', value: item.price.toFixed(2) },
        quantity: item.quantity.toString(),
      })),
    }],
  });

  const order = await client.execute(request);
  res.json({ orderId: order.result.id });
});

app.post('/api/paypal/capture-order', async (req, res) => {
  const { orderId } = req.body;
  const request = new paypal.orders.OrdersCaptureRequest(orderId);
  request.prefer('return=representation');

  const capture = await client.execute(request);
  const captureData = capture.result;

  if (captureData.status === 'COMPLETED') {
    const referenceId = captureData.purchase_units[0].reference_id;
    await OrderService.markPaid(referenceId, {
      paypalOrderId: captureData.id,
      captureId: captureData.purchase_units[0].payments.captures[0].id,
    });
    await FulfillmentService.initiate(referenceId);
    res.json({ status: 'COMPLETED', internalOrderId: referenceId });
  } else {
    res.status(400).json({ status: captureData.status, error: 'Payment not completed' });
  }
});
PayPal for Subscriptions and International Payments
PayPal’s subscription API is a reliable choice for recurring payments. It’s especially popular in places where people aren’t comfortable saving their card numbers on random sites PayPal subscriptions tend to stick around longer compared to card-based ones. (If you’re building a subscription-based ecommerce platform, our subscription ecommerce platform development guide covers billing engine design, dunning logic, and the full architecture in depth.)
If you’re dealing with international buyers, PayPal takes care of currency conversion and supports over 25 currencies. But keep an eye on those conversion fees they’re usually an extra 3-4% on top of what you pay per transaction. If you're selling a lot globally, it’s smart to check how Stripe’s conversion rates compare and figure out if it makes more sense to price things in local currencies instead.
Here’s something you shouldn’t ignore: PayPal’s dispute process leans heavily in favor of the customer. Set up order and shipping tracking in your PayPal integration from day one because, sooner or later, you’ll get that dreaded “item not received” claim and you’ll want all your records ready.
Apple Pay Integration: Frictionless Mobile Checkout
Apple Pay is a game changer for mobile checkout, especially on iOS. When shoppers can use Face ID and skip the hassle of typing out their card number two taps and they’re done mobile conversion rates spike. After adding Apple Pay, lots of ecommerce sites see conversions jump by 15-20%.
Requirements and Compatibility
If you want to build this out, here’s what you’ll need:
- Domain verification: You have to verify your domain with Apple. That involves hosting a file at
/.well-known/apple-developer-merchantid-domain-association. - Apple Developer Account: You need an Apple Developer Account for a merchant ID and payment processing certificate.
- Browser support: Make sure you’re using a compatible browser. Apple Pay only works in Safari on macOS (with Touch ID or a paired iPhone), Safari on iOS, and native apps. Chrome or Firefox won’t cut it.
- Payment processor support: Your payment processor needs to support Apple Pay. Both Stripe and PayPal do, so you don’t have to open a new merchant account.
Apple Pay Through Stripe (Recommended Approach)
If you want the easiest way to enable Apple Pay (and Google Pay), Stripe’s Payment Request Button rolls them into one simple API. That’s usually the best option for most online stores.
// Apple Pay via Stripe Payment Request API
const stripe = await loadStripe(process.env.NEXT_PUBLIC_STRIPE_PUBLISHABLE_KEY);

const paymentRequest = stripe.paymentRequest({
  country: 'US',
  currency: 'usd',
  total: {
    label: 'Order Total',
    amount: orderTotalInCents,
  },
  requestPayerName: true,
  requestPayerEmail: true,
  requestShipping: true,
  shippingOptions: [
    {
      id: 'standard',
      label: 'Standard Shipping (5-7 days)',
      detail: 'Arrives by next week',
      amount: 599,
    },
    {
      id: 'express',
      label: 'Express Shipping (1-2 days)',
      detail: 'Arrives tomorrow or the next day',
      amount: 1499,
    },
  ],
});

// Check if Apple Pay (or Google Pay) is available
const canMakePayment = await paymentRequest.canMakePayment();
if (canMakePayment) {
  // Mount the payment request button - it renders as an Apple Pay button
  // on Safari/iOS, or Google Pay button on Chrome/Android
  const prButton = elements.create('paymentRequestButton', {
    paymentRequest,
  });
  prButton.mount('#apple-pay-button');
} else {
  // Hide the Apple Pay button - the customer's device doesn't support it
  document.getElementById('apple-pay-button').style.display = 'none';
}

// Handle the payment token
paymentRequest.on('paymentmethod', async (event) => {
  // Confirm the PaymentIntent with the Apple Pay token
  const { error, paymentIntent } = await stripe.confirmCardPayment(
    clientSecret,
    { payment_method: event.paymentMethod.id },
    { handleActions: false }
  );

  if (error) {
    event.complete('fail');
    showPaymentError(error.message);
  } else {
    event.complete('success');
    if (paymentIntent.status === 'requires_action') {
      // Handle additional authentication if needed
      const { error: confirmError } = await stripe.confirmCardPayment(clientSecret);
      if (confirmError) {
        showPaymentError(confirmError.message);
      }
    }
    // Payment succeeded - webhook handles fulfillment
    showOrderConfirmation(paymentIntent.id);
  }
});
How Apple Pay Tokenization Works
When you pay with Apple Pay, here’s what happens: after you authenticate with Face ID or Touch ID, Apple generates a one-time payment token just for that transaction. Your actual card number stays hidden Apple swaps it out for a unique Device Account Number that only the card network can trace back to your card.
That’s a big deal for security. If someone managed to hack your server and get everything from Apple Pay transactions, they’d end up with nothing they could use. There are no real card numbers, just those tokens, and they’re useless for anything else.
Checkout Architecture: How Not To Lose Orders
Wiring up payment methods on their own isn’t that hard. The tricky part is the checkout system that connects everything: juggling different payment providers, recovering smoothly from failures, and keeping your records straight even when things get busy.
Frontend vs. Backend: Who Does What?
You don’t want a blurry line between what the frontend and backend should handle, so here’s how to split it up:
Frontend handles:
- Showing all the payment options
- Using SDKs like Stripe Elements, PayPal Buttons, or Apple Pay to grab payment details
- Giving customers instant feedback if something’s off
- Updating the payment status right in the UI
- Running any payment-provider-specific flows like popping up 3D Secure screens or Apple Pay sheets
Backend handles:
- Calculating the order total (never trust the browser for this)
- Creating payment intents or orders with each provider
- Processing webhooks and handling events as they come in
- Keeping track of order state and triggering fulfillment at the right moment
- Making sure duplicate orders don’t sneak through (idempotency)
- Retrying payments when something flaky happens
- Logging everything for audits
It’s pretty simple: the frontend runs the show you see, but the backend owns anything that affects money, fulfillment, or inventory. This separation is especially critical if you’re going with a headless ecommerce architecture, where the frontend and backend are decoupled by design.
Order State Machine
You’re best off treating every order like it moves through a state machine. Lay out exactly which states are possible, and what can trigger each transition. That way, you won’t accidentally fulfill an order that was never paid, or end up in some weird limbo state that breaks the rest of your system.
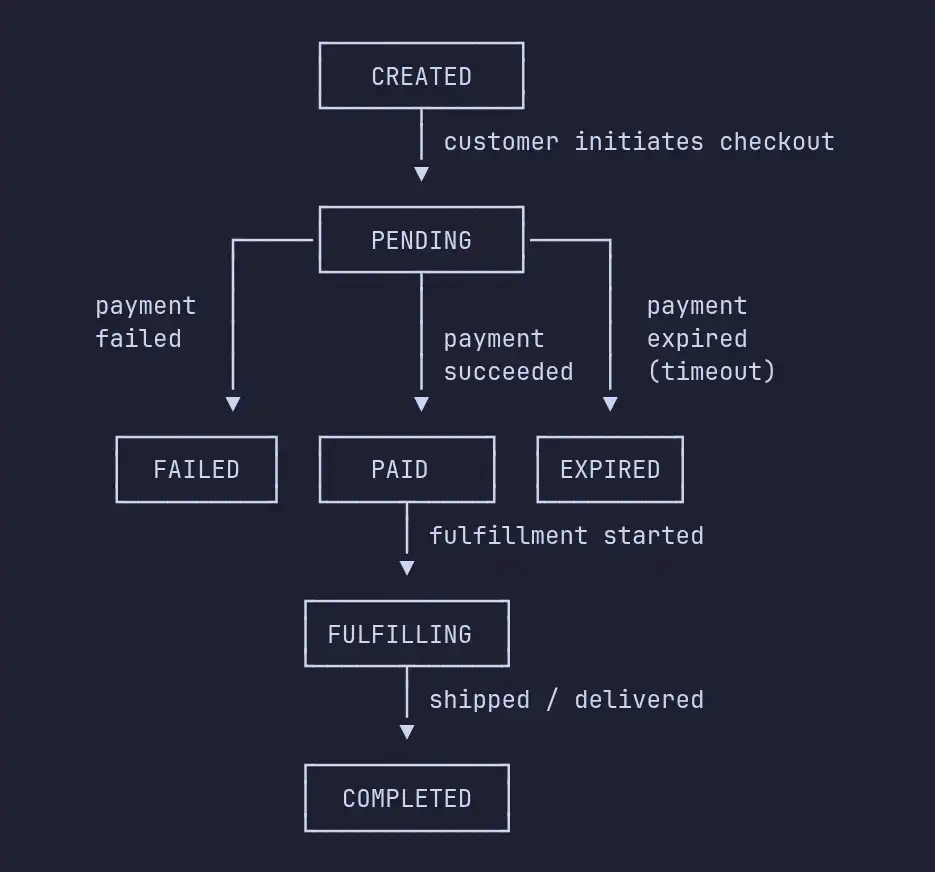
We track every state change with a timestamp, the event that triggered it (like a webhook event ID or an admin action), and what the state was before. Having this audit trail has saved us more than once when we’re digging into weird cases like why an order didn’t get fulfilled when it should’ve, or vice versa.
Microservices vs. Monolith for Checkout
People ask this all the time. Honestly, for most ecommerce platforms, you should start with a modular monolith.
Here’s why: checkout isn’t some loose bundle of features. It’s a mess of tightly connected stuff order management, payments, inventory reservation, fulfillment. In a monolith, one checkout operation is just a single database transaction. With microservices, suddenly you need a saga across four or more services, handling eventual consistency, rolling back when things go sideways, and dealing with silent failures that are a nightmare to debug.
There are a few good reasons to pull payment processing into its own service, though:
- PCI compliance scope: PCI compliance becomes easier because only the payment service handles sensitive info.
- Independent scaling: You can scale payment processing independently, which helps during flash sales or heavy webhook traffic.
- Provider abstraction: You get a cleaner separation, so it’s easy to swap out providers or add new ones behind a well-defined API.
If you’re set on microservices, pour time into an event-driven setup with a solid message broker. We use a mix of DB-backed job queues and event streams, depending on what we’re doing. Don’t rely on synchronous HTTP calls between services they’ll just set you up for chain-reaction failures.
Handling Asynchronous Events at Scale
Webhooks are messy. They’re always asynchronous, and things go wrong network hiccups, servers restarting, deployments happening at the wrong time. You’ll miss webhooks now and then. For real-world checkout systems, you absolutely need these three things:
1. Idempotent Processing
Stripe and PayPal will send the same webhook event more than once. Your handler needs to produce the same outcome whether it gets that event one time or five.
// Idempotent webhook processing pattern
async function processWebhookEvent(event) {
  return await db.transaction(async (tx) => {
    // Acquire a lock on this event to prevent concurrent processing
    const processed = await tx.query(
      `SELECT id FROM processed_events
       WHERE event_id = $1 FOR UPDATE SKIP LOCKED`,
      [event.id]
    );

    if (processed.rows.length > 0) {
      return { status: 'already_processed' };
    }

    // Process the event within the transaction
    await handleEvent(event, tx);

    // Mark as processed
    await tx.query(
      `INSERT INTO processed_events (event_id, event_type, processed_at)
       VALUES ($1, $2, NOW())`,
      [event.id, event.type]
    );

    return { status: 'processed' };
  });
}
2. Reconciliation Jobs
Don’t just trust webhooks to keep everything synced. Set up a reconciliation job to run every 15-30 minutes. It checks your payment providers for any orders that are still stuck as PENDING after a certain period like anything over 30 minutes for card payments, or 60 minutes for PayPal. This way, you’re not waiting forever for an answer or leaving customers in limbo.
// Reconciliation job - catch missed webhooks
async function reconcilePendingOrders() {
  const staleOrders = await OrderService.findByStatus('PENDING', {
    olderThan: new Date(Date.now() - 30 * 60 * 1000), // 30 minutes
  });

  for (const order of staleOrders) {
    try {
      if (order.paymentProvider === 'stripe') {
        const pi = await stripe.paymentIntents.retrieve(order.stripePaymentIntentId);
        if (pi.status === 'succeeded') {
          await OrderService.markPaid(order.id, { source: 'reconciliation' });
          await FulfillmentService.initiate(order.id);
        } else if (['canceled', 'requires_payment_method'].includes(pi.status)) {
          await OrderService.markExpired(order.id);
        }
      }
      // Similar logic for PayPal orders...
    } catch (err) {
      console.error(`Reconciliation failed for order $\{order.id}:`, err);
      // Don't throw - continue processing other orders
    }
  }
}
3. Retry Logic with Exponential Backoff
Webhooks aren’t foolproof. Sometimes your handler fails a database times out, a service is down. You need smart retry logic for this. Don’t just let the payment provider handle retries, their schedule is usually too slow for cases where speed matters (like shipping decisions). Use something like Bull, BullMQ, or a database-backed job queue to retry failed webhook events. Start at 1 minute, then 5, then 15, then 1 hour. And if an event keeps failing, send it to a dead-letter queue so you can investigate without clogging up your main system.
Security Best Practices for Checkout Architecture
Security isn’t optional in checkout it’s everything. A breach doesn’t just hurt your bottom line; it wipes out trust, sometimes for good.
PCI DSS Compliance: Go with tokenized payments Stripe Elements, PayPal’s client SDK, whatever fits. Never handle raw card numbers. If card data never touches your servers, your PCI DSS scope is much simpler. Make sure you document your approach and check it regularly quarterly is a good rhythm.
Encryption: Use TLS 1.2 or higher for all traffic. No exceptions. Encrypt sensitive info at rest customer emails, shipping addresses, anything personal. Let your payment provider handle payment method storage for returning customers so you don’t need to build or secure your own vault.
Fraud Detection: Stack your defenses.
- At the provider: Enable tools like Stripe Radar or PayPal’s fraud checks.
- In your app: Limit how often someone can check out per IP or customer account. Flag any orders where billing and shipping country don’t match.
- Behaviorally: Keep an eye out for weird patterns like the same card being used across multiple accounts, big purchases from brand new users, or orders sent to freight forwarding addresses.
Webhook Security: Always verify webhook signatures. Use a unique webhook secret for each payment provider. Log every incoming webhook event (including the raw payload) so you can investigate if things get weird.
Building a multi-provider checkout system?
We've architected checkout systems handling Stripe, PayPal, and Apple Pay with proper webhook reconciliation, idempotency, and fraud detection - for ecommerce platforms processing high transaction volumes.
Book a free scoping call and we'll review your checkout architecture and recommend the right payment stack for your business model and target markets.
Stripe vs. PayPal vs. Apple Pay: A Real Comparison
Here’s how these three shape up in the real world for devs and business owners-based on what we’ve actually seen, not just what their marketing tells you:
| Factor | Stripe | PayPal | Apple Pay |
|---|---|---|---|
| Integration effort | 2-3 days for basic, 1-2 weeks for full | 3-5 days for basic, 2-3 weeks for full | 1-2 days (through Stripe/PayPal) |
| API quality | Excellent. Consistent, well-documented, idiomatic SDKs | Adequate. Multiple API versions coexist, documentation can be inconsistent | N/A (uses Stripe or PayPal as processor) |
| Global coverage | 47+ countries, 135+ currencies | 200+ markets, 25+ currencies | 70+ countries, depends on processor |
| Transaction fees | 2.9% + $0.30 (US cards) | 2.99% + $0.49 (standard) | No additional fee (processor fee applies) |
| Developer experience | Best in class. Great test mode, CLI tools, detailed logs | Functional. Sandbox can be flaky, error messages occasionally opaque | Minimal surface area - straightforward |
| Customization | Full control with Elements. Custom forms, layouts, styling | Limited with Smart Buttons. More control with Advanced Integration | Button styling only. Apple enforces strict UX guidelines |
| Recurring billing | Excellent. Stripe Billing handles complex subscription models | Good. PayPal Subscriptions works well for simple recurring | Not applicable for recurring - cards are tokenized per-transaction |
| Dispute handling | Dashboard + API. Evidence submission is straightforward | Heavily buyer-favored. Resolution center is functional but slow | Handled by the underlying processor |
When to Use Which
Stripe is the best starting point for most online shops. If you want flexibility and a good developer experience, Stripe should be your primary processor.
PayPal deserves a spot in your checkout don’t skip it. People trust PayPal, and its global reach can bump up conversions, especially outside the US. Adding PayPal alongside Stripe usually increases conversion rates by 8-14%.
Apple Pay is a must if you get a lot of iOS traffic. Check your analytics if 30% or more of your users are on Safari/iOS, Apple Pay can quickly pay for itself thanks to higher conversion rates.
If you're still deciding whether to build a custom checkout or work with an existing platform, our build vs buy decision guide walks through the real trade-offs.
The Multi-Provider Architecture
Honestly, most stores end up supporting all three. Here’s the architecture pattern we go with:
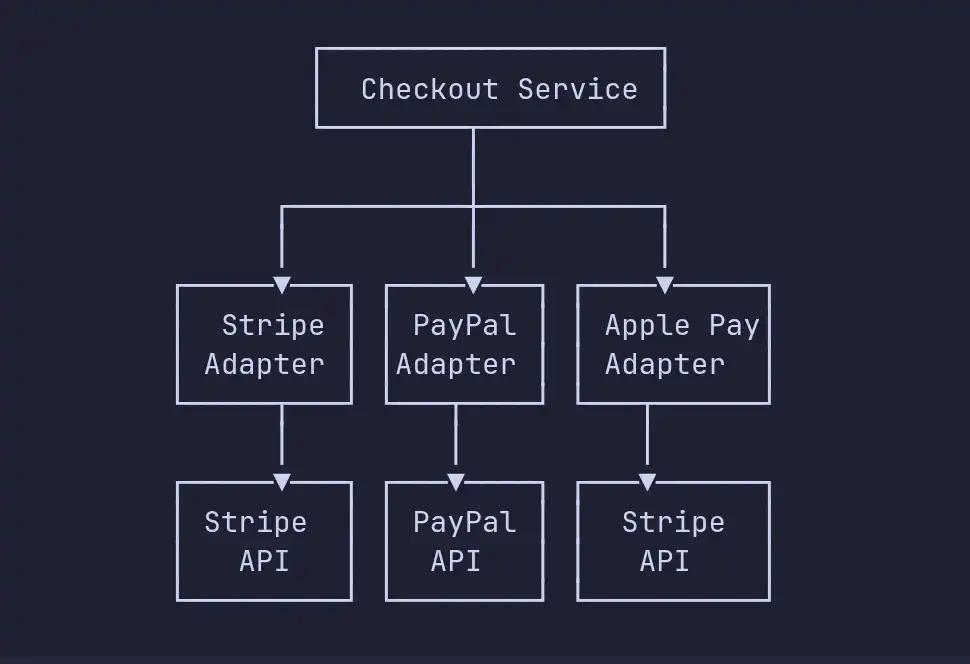
Each adapter implements a common PaymentProvider interface:
// payment-provider.interface.js
class PaymentProvider {
  async createPayment(order) { /* returns { id, clientData } */ }
  async capturePayment(paymentId) { /* returns { status, metadata } */ }
  async refundPayment(paymentId, amount) { /* returns { refundId, status } */ }
  async handleWebhook(payload, signature) { /* returns normalized event */ }
}
This setup keeps your checkout process flexible. You can add new payment options Google Pay, Klarna, even local methods by just dropping in an adapter. No need to mess with your existing checkout logic. If you're building a D2C ecommerce platform, this multi-provider pattern is especially important - your customers expect every payment option to work seamlessly.
Best Practices: If We Were Chatting Over Coffee
We’ve built checkout systems for all kinds of ecommerce platforms. Here’s what we’d stress:
-
Do all calculations on the backend. Figure out prices, discounts, taxes, shipping everything on your server using real data. The frontend only shows these numbers; it never decides anything.
-
Put webhooks first. Make sure your system can handle everything with only webhooks. Client-side confirmations are just extras for a smoother experience, but the backend should always be solid.
-
Prioritize observability from the start. Log everything: state changes, webhook calls, API interactions. When something blows up late at night say, on Black Friday you want to know exactly what happened without losing your mind.
-
Test using real payment flows. Stripe test mode and PayPal sandbox are fine for development, but they won’t catch everything. Before you go live, run actual transactions with real cards; refund them afterward if you need. This uncovers issues you’d miss otherwise.
-
Think about refunds and disputes early. Build the refund process at the same time as payments. Store whatever you’ll need for disputes: order info, tracking numbers, customer messages, delivery confirmations.
-
Reserve inventory at the start of checkout, not after payment. If you wait until payment succeeds, you risk overselling. Two customers could grab the same item. Lock it in when checkout begins; let it go if payment doesn’t work out.
Frequently Asked Questions
Do I need PCI compliance if I use Stripe Elements?
You do, but it’s pretty simple. Stripe Elements and PayPal’s client SDK mean card data never hits your servers, so you qualify for SAQ A or SAQ A-EP. There’s still an annual self-assessment and basic security habits use HTTPS, lock down access but you skip the big PCI audit.
Should I build my own payment orchestration layer or buy one?
Most stores only need a lightweight adapter layer. Platforms like Spreedly or Primer make sense when you’re processing tons of payments, juggling processors for cost, or operating in tricky markets where payment options vary. If your annual GMV is under $10 million, it’s usually not worth the extra trouble.
How do I handle failed payments without losing the customer?
Set up a retry workflow. When a payment fails, keep the customer on the checkout page, show a clear error, and invite them to try again or use a different method. Save their cart and details so nothing disappears. For soft declines (like low funds), let them retry with the same card; for hard declines (stolen cards, bad numbers), ask for a new payment option.
Can I add local payment methods like iDEAL or PIX?
Stripe’s automatic_payment_methods features do this nicely it shows relevant options based on location and currency. PayPal’s Smart Payment Buttons adapt too. If you’re focusing on places like the Netherlands, India, or Brazil, enable local methods through your existing provider. It’s way easier than working out each integration yourself.
Ready to build a checkout system that actually converts?
We build ecommerce payment infrastructure multi-gateway integrations, webhook orchestration, and scalable checkout architecture for platforms processing serious transaction volume.
Book a free scoping call and we'll map your payment requirements to the right integration strategy, with a realistic architecture plan and budget.
We build real, production ecommerce platforms-handling big transaction volumes, multi-provider checkout, PCI compliance, and all the messy stuff behind the scenes. If you’re working out your payment system and want to compare ideas, reach out. We’d love to hear what you’re building.